Friday, November 11, 2011

Coconut Ginger Snaps

It is Aloha Friday on 11/11/11 and that is reason enough to whip up a batch of seasonal cookies to share with family or friends. These treats are so easy to make that you can even get your kiddos involved in the fun and the warmth and aroma it creates in your home will make you want to bake every night of this holiday season. I promise it is much more satisfying than a holiday glade candle because your nose and taste buds get a nice treat that everyone will appreciate!

Gluten-Free Organic Ingredients
makes about 20 cookies
  • 2 1/2 cups brown rice flour
  • 1 cup sucanet (evaporated cane juice)
  • 1 egg
  • 1/2 cup unsalted butter
  • 3 Tbs Molasses
  • 1 teaspoon vanilla extract (make sure to get a gluten and corn syrup free brand)
  • 1 teaspoon coconut extract (optional)
  • 1 1/2 teaspoons ground ginger
  • 1 1/2 teaspoons  ground cinammon 
  • 1/2 teaspoon baking soda
  • 1/2 teaspoon sea salt
  • 1/4 teaspoon  ground nutmeg
  • 1/4 teaspoon  ground cloves
  • 1 cup unsweetened shredded coconut
  • 2 TBS sucanet
- Pre-heat oven to 375 and place 1 oven rack on the lower middle position and one on the upper middle position.
- On a baking sheet with parchment paper spread the coconut flakes evenly and bake in the oven for 10 - 15 minutes or until toasted.
- In a bowl, add the coconut flakes and 2 Tbs. honey or sucanet and mix together.
- In a large mixing bowl, beat the butter, sucanet, egg, molasses, vanilla, and coconut extract with an electric mixer or by hand.
- Add the flour and the rest of the dry ingredients and beat until blended.
- Roll the dough into 1 1/2 inch balls, dip in coconut flakes, and place on a baking sheet lined with parchment paper spaced 2 inches apart.
- Slightly flaten each cookie by pressing with a spoon or thumb.
- Bake for 20 minutes and rotate the baking sheets halfway through baking time.
- If you have allergies to tree nuts just make without the coconut ingredients.

Now enjoy these scrumptious tasty treats!


Monday, November 7, 2011

Healthy Holidays

Now that Halloween has come and gone and we are already in the month of November (can you believe it?) the holiday season is in full swing. We all know what that means: lots of social gatherings, lots of food, lots of drinking, did I mention lots of food? With high calorie meals and sweets constantly around and practically in your face it can be hard not to go overboard on the eating during this time of year. If you need a break from the high fat foods and sugary sweets just try this simple recipe that is not only light in fat and calories, but very filling and rich in plenty of nutrients. 

Don't get me wrong, I fully enjoy holiday treats or just sweets in general, but they still should be enjoyed sparingly even when you make them with healthy unrefined ingredients. My hubby and I love to splurge once a week on a heavier meal (usually meat and higher fat foods) and one of my homemade gluten-free tasty treats, but the rest of the time we stick to the basics and keep it simple: brown rice, quinoa, veggies, and beans. It gives our sensitive stomachs a break from hard to digest rich foods and it makes those splurge eats and treats even more enjoyable! So this year keep a more balanced ratio of healthy foods and holidays splurges by cooking more simple meals at home. Here is just one of the many simple and healthy meals I will be sharing this season.


Aduki Bean Soup with Cabbage Salad
Serves 4

- Add 2 cups dry Aduki beans and 8-10 cups water in a cooking pot.
- Bring to a boil, then turn down to low and simmer for 1 1/2 hours. These beans are great because of their short cooking time.
- At the end of the cooking time season with desired amounts sea salt, ground black pepper, granulated garlic, and oregano.
- Add fresh chopped cilantro and onion to the beans and serve with a scoop of brown rice or quinoa
- Then top it off with the prepared cabbage salad.

Prepare the cabbage salad while beans are cooking:

-  For 15 minutes soak 1/2 cabbage head, 2 carrots, green onion bunch, and aduki bean sprouts (any bean sprouts will work) in a large bowl with 1 tablespoon unrefined Apple Cider Vinegar and water to remove all bacteria and parasites.
- Rinse veggies and finely chop the cabbage, grate the carrots, chop the green onion, then add all chopped veggies and sprouts together in a large bowl.
- Add sea salt and about a half teaspoon each of cayenne, chili powder, and paprika to the salad.
- Add less of the seasonings if you do not handle heat well, it can be spicy. 
- Add fresh squeezed juice of 2 lemons.
- With clean hands or spoon mix all salad ingredients together.

I like to add the cabbage salad to the bean soup with the quinoa or brown rice and eat it all together in one big soup bowl. For healthy fats I add a teaspoon of olive oil or some fresh sliced avocado on top.  This meal has so many great flavors and they all come together very nicely. So eat up and enjoy, I know I did!


Fun Health Facts:

- Aduki beans detoxify the body, reduce swelling and inflammation, and promote weight loss.
- Aduki beans and all sprouts are easier to digest than other beans and legumes.
- Cabbage improves digestion, beautifies the skin, and purifies the blood. It can be used to treat constipation, the common cold, cough, and even mental depression or irritability.
- Carrots are one of the richest sources of the anti-oxidant beta carotene which protect against cancer and other diseases.


Monday, October 31, 2011

Happy Healthy Halloween!

Halloween is a favorite holiday for many of us because it is filled with fun activities and good times with family and friends. With lots of pumpkins, costumes, scares, and sweets, it is hard not to have a great time. I enjoy all these things about Halloween but I especially enjoy the pumpkin carving and pumpkin seed roasting. This year my hubby and I went with the island theme, to match our new surroundings, and the end product was very satisfying!

Check them out =) Cute huh?

Next time you carve your pumpkin, don't forget to save the seeds and enjoy the most nutritious treat of Halloween. It is so quick and easy to make, just follow these simple steps:

Gluten-Free Roasted Pumpkin Seeds

- Pre-heat the oven to 375 degrees
- Scoop out all the seeds from the pumpkin and separate from the stringy flesh.
- Rinse thoroughly and pat dry with paper towels.
- Spread seeds evenly on a large flat pan covered with parchment paper.
- Drizzle with olive oil, sea salt, freshly ground pepper, granulated garlic, and paprika.
- Roast in the oven for about 30 minutes or until golden brown and crisp.
- Turn and mix the seeds after fifteen minutes to ensure even roasting on each side.

You will absolutely enjoy these crunchy tasty treats!


 - Pumpkin seeds are packed with protein, omega 3 healthy fats, and fiber.

- They are rich in magnesium, iron, phosphorus, and zinc.

- They also aid in clearing the digestive tract of harmful bacteria and pathogens and can soothe nausea and digestive discomfort.
For those of us with celiac disease and gluten-intolerance, Halloween candy is just not a safe option to enjoy without risking exposure to gluten followed by another painful bathroom ordeal. Last year I ate candy that claimed to be gluten-free but my gut reaction told a different story. So stay safe this year and splurge on these tasty homemade Halloween treats anyone would love!

Gluten-Free Oatmeal Chocolate Chip Cookies

Pre-heat the oven to 350 degrees
Use organic ingredients and hormone-free butter and eggs.
  • 3 cups GF oats (Bob's Red Mill is a good brand)
  • 1 cup ground flaxseed
  • 1/2 cup brown rice flour
  • 1 1/2 cups evaporated cane juice (aka: sucanet, an unrefined sweetener)
  • 1 teaspoon sea salt
  • 1 teaspoon baking soda
  • 3 eggs
  • 2 sticks melted unsalted butter
  • 1/2 cup raw honey (choose locally made)
  • 1 TBS Molasses
  • 2 teaspoons GF and corn syrup free vanilla extract
  • 1 package chocolate chip cookies (Enjoy Life Brand is gluten, soy, nut, and dairy free)
 Optional additions and variations if you do not have any nut allergies:

- 1 cup pure peanut butter, preferably organic, or
- 1 cup unsweetened coconut flakes

Bake the cookies for about 15-20 minutes.

To make sure they do not fall apart when eating you can refrigerate for at least 30 minutes.

Happy Halloween!


Check out our costumes, this year Angel went for hysterical and I went for crafty.

Hint: Look at the Do


Can you guess who Angel is this year?


Rocky Balboa presents: Clubber Lang! "I pity the fool"


I made my Sea Turtle Costume from cardboard and fabric scraps.      

Friday, October 21, 2011

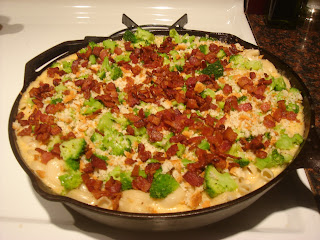
Fall Favorite: GF Mac N Cheese

Whenever you feel the need to create a meal that will satisfy everyone's growling stomach and ease exhaustion, then try this simple and traditional favorite of kids and adults alike. This recipe is perfect for the very hungry, the very big appetite, or the need for a comforting meal after a long day, week, chilly weather, or anything that necessitates a relaxing night with good people and good food.
Place a rack in the middle of the oven and preheat to 350 degrees

Organic Ingredients
  • 1 package Tinkyada GF Brown Rice elbow pasta (cooked in salted water)
  • 3 cups unsweetened Almond Milk (my favorite brand: Blue Diamond Almond Breeze, original flavor
  • 3 Tbs brown rice flour
  • 1 Tbs tapioca flour
  • 2 Tbs butter
  • 1 cup (8 ounces) grated monterey jack cheese, or pepper jack for a spicy kick
  • 1 cup (8 ounces) grated mild cheddar cheese
  • 2 teaspoons cayenne pepper (optional, adds a nice spicy kick)
  • 2 teaspoons chili powder (optional, adds a nice spicy kick)
  • 2 teaspoons paprika
  • kosher or sea salt
  • freshly ground black pepper
Choose dairy products that are organic or from free-range, grass-fed cows, with no hormones and antibiotics.

Prepare Toppings 
  • Chop up and cook 1 package (8 ounces) bacon: Applegate Sunday Bacon Uncured is gluten and casein free, with no preservatives, nitrates, nitrites and from animals that are vegetarian fed.
  • GF bread crumbs: 2 slices of Udi's gf whole grain brown rice bread chopped in a food processor or with hands.
  • Chop broccoli.
- In a small bowl, whisk together 1/4 cup almond milk with rice flour and tapioca flour.
- On the stove-top over medium to medium high heat, in a large cast iron skillet or saucepan, add the rest of the milk with milk flour mixture and whisk constantly while cooking until mixture thickens.
- Add the butter, cayenne, chili powder, paprika, salt and pepper, and whisk together. 
- Turn the heat down to low and add the grated cheese and mix until completely melted.
- Remove the pan from heat, add the cooked hot pasta, and mix thoroughly.
- Transfer to a baking dish or leave in the skillet (if using a cast iron skillet).
- Top with brocceli
- Bake for 15 minutes, then top with the bread crumbs and pre-cooked bacon bits. 
- Bake 15 more minutes and serve hot. 
Perfect for a cozy night in with the family, friends, your lover, or the little kiddos. Put a movie on, put your feet up, and enjoy your full warm belly. It's time to relax. =)

Happy Friday!


Friday, October 14, 2011

Anytime is the perfect time for a Pancake Party!

It is the perfect time of the year to make and enjoy some delicious and nutritious pancakes with your family, kids, or friends. So get together and spend some fun quality time whipping up something that everyone loves. They are so easy to make that anyone can do it, even the kiddos and all you bashful cooks. Forget those pre-made boxed pancake mixers, they have no taste and no nutritional value. Now is the time to start making your favorite foods from scratch, it is so much easier than you think and well worth it in the end. Here are some of my favorite pancakes you can try:
  • Sweet Potato Pancakes
  • Pumpkin Pancakes
  • Banana Pancakes
  • Buttermilk Pancakes
GF Pancake Recipe
Choose your flavor: Puree cooked sweet potato or pumpkin, mash very ripe bananas, or make your own buttermilk by mixing 1 cup choice of nut or dairy milk with 1 TBS. lemon juice or vinegar and let sit on the counter for 15 minutes.
- 1 cup pancake flavor filling (pick one from above)
- 2 cups brown rice flour or millet flour
- 2 Tbs. fresh ground flaxseed 
- 2 cups milk: use organic milk, or any nut milk, buttermilk pancakes need 2 Tbs. acid with the 2 cups milk of choice and do not need 1st ingredient on this list.
- 2 beaten eggs (choose organic or hormone-free and cage-free eggs, if you have an egg allergy just substitute with 2 more Tbs. of fresh ground flaxseed)
- 2 Tbs. melted unsalted organic or hormone free butter (vegans can substitute with coconut oil)
- 2 Tbs. grade B maple syrup (optional)
- 2 teas. vanilla extract  (choose gluten-free and corn-syrup free)
- 2 Tbs. fresh lemon juice (optional)
- 2 teas. cinnamon (optional)
- 1/2 teas. salt

In a large bowl, mix together the flavor filling of choice with eggs, milk, melted butter, maple syrup, and vanilla until smooth.  Add the flour, fresh ground flaxseed, salt, cinnamon and mix until well incorporated, add the lemon juice at the end for lighter pancakes and cook in a oiled/buttered and heated skillet.

Top with 100% Grade B Maple Syrup or freshly made fruit syrup.
*Never use Grade A Maple Syrup, it contains harmful ingredients like formaldehyde.

GF Fresh Fruit Syrup
Choose from lilikoi, blueberry, cranberry, or berry of choice.
- 1 cup water or juice (blueberry, cranberry, or pomegranate).
- 1 cup berries (fresh or frozen).
- 2 Tbs. fresh lemon juice.
- 1/2 cup sucanet or coconut sugar.
- 1 Tbs. tapioca flour.
In a saucepan,  mix the water/juice, berries, sweetener, and tapioca flour, bring to a boil over medium heat, reduce heat to a simmer and let cook until mixture reduces. Remove from pan and let cool and firm up.

I do not have to tell you to enjoy this one! Today is Aloha Friday and I made some banana pancakes for me and my happy hubby from some freshly ripened bananas I picked up from the farmers market yesterday. I can't wait to try the sweet potato pancakes next!

Onolicious!

*Ono means delicious in Hawaiian. ;-)

This one is the buttermilk pancake with lilikoi syrup.


Thursday, October 6, 2011

Fabulous Fresh Fish Dinner

Yesterday, Angel made his second attempt to catch us a fresh fish for dinner. On his first attempt he got caught on the rocks and fought for hours to get his hook free, twice, but luckily he is a very patient fisherman, which I am so proud of. =)

So this time we headed to a pier, so the rocks would not be an issue, and waited patiently after he cast out his first line. After some time, he reeled in the line after feeling a tug and saw that something had stealthily snatched up the bait without getting hooked. So he tried again and it was not much longer that he got his first catch! He started reeling it in and when the fish finally emerged, we saw how huge it was, and then we realized it wasn't a fish at all, it was a baby Hammerhead Shark!

Angel lifted the Shark up and we saw that it was bleeding pretty good, so he wanted to get the hook out and release it quickly so it wouldn't die. Realizing he did not have any pliers to pull out the hook safely, and with no experience handling sharks, Angel asked a nearby fisherman for help. The guy quickly and with no hesitation pulled out the hook with his bare hands and threw him back in the ocean. Whew, what an adrenaline rush! I certainly have never seen or been that close to a Shark!

Unfortunately, I failed to catch a picture of the shark, but with the use of a AA battery-operated camera with storage of only 11 pictures, I sadly missed the opportunity because the batteries were not in and I could not delete a picture fast enough to make room for just one more. Angel attempted a few more times for another catch and made friends with the other fisherman who helped save the day. He gave Angel some tips and pointers on where to go and what kind of bait to use for his next try.

Instead of fresh fish caught by my husband, I made dinner with a fresh catch we picked up from the local market. So, if you get in the mood for a healthy, light, and satisfying fish meal, give this simple  recipe a try.

Grilled Mahi Mahi on a bed of Brown Rice and Fresh Greens

- Cook desired amount of brown rice in rice cooker or pot.
- Choose a white fish, fresh or frozen, and wild caught (avoid farm raised fish).
- Marinate the fish in: olive oil, lemon juice, salt, pepper, cayenne, paprika, and chili powder. 
- Prepare Fresh Green Salad: I used fresh green leaf lettuce, cilantro, purple onion, carrots, and avocado.
- Top with your favorite fresh salsa or freshly made lemon and olive oil vinaigrette.
Tip: Soak all fresh produce in a mild solution of apple cider vinegar for 15 minutes to remove bacteria and parasites.Use 1 T. vinegar per gallon of water or 1/4 C. per sinkful.
- Cook fish on a grill pan or outdoor grill until white and cooked through.

Hope you enjoy this nutrient dense, delicious, and satisfying meal...we certainly did!


Monday, October 3, 2011

Outdoor Activity

One of the healthiest things we can do for our bodies is actually easier to do, more affordable, and more enjoyable than most people think. These days, when people hear about the importance of daily exercise and physical activity they think about huffing and puffing inside an expensive gym on a treadmill, elliptical, or with a personal trainer.  You can actually get your daily activity in a lot more affordable ways and have fun while doing it. If you work inside an office all day, I can't imagine that the next thing you would want to do is to go indoors again. Enjoying the outdoors is so important for the mind, body, and soul and can awaken your senses even after the daily 9-5 routine. It doesn't make a difference if you live near a beach, lake, river, or in the mountains, desert, or city! And whether you get all the seasons or just one of them, there is always something nearby just waiting to be explored and enjoyed. So start exploring today: walk, hike, run, swim, bike, kayak, and dance so you can see and enjoy the beauty all around you and take a breath of fresh air.


Quality over Quantity


When I was in my early 20's I would spend hours in the gym thinking that the more exercise I did the fitter and more in shape I would get. Over the years I have learned that not only do you use up precious time that could be enjoyed with family and friends, but you also break down your body from overuse rather than making it stronger. I have always loved being physically active and even as a child I would get up before the sun and run before school every day with my dad. So, it is not hard for me to get an hour of play every day doing the things I love: running, swimming, beach volleyball, and intense body strength routines with my husband a couple times a week. However, it could be as simple as walking or biking to work, or hiking a nearby trail to see the fall leaves. And for only 30 minutes a day with a friend or loved one, you'll feel revitalized, re-energized, and recharged. Everyone's body and fitness goals are different, so adjust them to your own and not the bodybuilder you see in the weight room.

Balance

It is important for both men and women to get a good balance of cardiovascular and strength training activities to attain a strong healthy body.  You still do not need to spend a lot of money to achieve both and you can do it in your own home, your back yard, or even better at your nearby park. Using your own body for developing and maintaining strength is all you need, and it's a lot more challenging than you may think.


So stay tuned for my quick and easy strength training videos that will guide you through the movements so you can feel fitter, healthier, and happier in life!

These are some of our pictures from a recent hike and volleyball beach day.


Friday, September 30, 2011

Eat Live Love Local

The great thing about our new community is there is an abundance of local farmers who get together at our neighborhood park and sell fresh produce every week. I stopped by yesterday to see what yummy goods I could find for our next meal and for my husband's sweet tooth and I happily came across a variety of local produce. I picked out some fresh kale for dinner, Okinawan sweet potatoes for a future pie just waiting to be made,  green onions for our weekend egg skillet, and the biggest sweetest smelling lemons I have ever seen! Growing up. my siblings and I had some awesome lemon trees in our yard that we used to make fresh lemonade, now I am going to use these lemons to make one of my husbands favorite treats: Lemon Meringue Pie.

If you get a craving for something delicious and nutritious, find your closest farmers market and go explore the goods, pick out the freshest produce you can find, and whip up a meal or tasty treat. Trust me, you can see, smell, and taste the difference. Not only does fresh local produce taste better, it contains far more nutrients (because it is allowed to ripen on the tree), and it boosts your immune system allowing for optimal health and wellness.

If you are interested in trying my gluten-free lemon meringue pie recipe, find some fresh lemons, fresh local eggs, and hormone-free butter and milk. These ingredients make up a big part of the pie. Luckily, lemons grow in many places and you can find local, hormone free milk and eggs even in the supermarket.  The key to a delicious and nutritious wholesome pie is the fresh foods and whole, unrefined ingredients.

Local Lemon Meringue Pie


GF Crust
This recipe should make enough for 2 pie crusts, you can refrigerate one for another time or double the filling recipe and make 2 pies. 
Pre-heat oven to 325
  • 1 1/2 cups brown rice flour
  • 1 1/2 cups almond meal
  • 1/2 cup Wholesome Sweeteners sucanet (aka: unrefined evaporated cane juice)
  • 1/2 teas. sea salt
  • 2 sticks unsalted butter (use organic or hormone-free)
- Grease a glass pie pan with butter.
- In a large bowl, combine and mix thoroughly all the dry ingredients.
- Cut cold butter into small cubes and knead into dry ingredients until well incorporated into a smooth dough.
- With your hands, press the dough evenly into the pan and up the sides.
- Bake the dough on the bottom rack for 15-20 minutes or until edges are slightly brown. 
- Cool the dough as you make the filling and leave the oven on to bake the filling.

GF Pie Filling
  • 1 cup Wholesome Sweeteners powdered sugar *gluten-free and unrefined
  •  3 Tbs. tapioca flour
  • 1 teaspoon grated lemon zest
  • 1/2 cup almond  milk (or local hormone-free milk)
  • 1/2 cup fresh squeezed lemon juice
  • 1 large egg
  • 2 large egg yolks
  • 2 Tbs. butter
- On the stove top, in a large saucepan, whisk together the sugar, tapioca flour, lemon zest, almond milk, and lemon juice.
- Bring to boil over medium heat and stir constantly until it thickens into a gel like mixture.
- Remove from heat.
- In a small bowl, whisk the eggs and egg yolk until smooth and then add the eggs into the saucepan with lemon gel mixture.
- Cook over medium heat, add the butter, and stir constantly until fully combined.
- Remove from heat and cover while making the meringue topping. 
*I use Wholesome Sweeteners brand for many of my baking ingredients because of their gluten-free and unrefined products. Be careful of conventional powdered sugar because it is not always gluten-free due to the addition of refined wheat flour.


GF Meringue Topping
  • 3 egg whites
  • 1/2 cup Wholesome sweeteners powdered sugar
  • 1/4 teaspoon vanilla extract
  • 1/4 teaspoon cream of tarter
- Beat the egg whites and cream of tarter until soft peaks form.
- Add the sugar and vanilla extract and keep beating until the filling is light and fluffy.

*When I didn't have an electric mixer, I just used some good ol' arm strength to get the meringue to form. It took quite some time, sweat, and endurance but if you have the willpower then go for it. If you already have an electric mixer it will take you way less time and leave you without the sore arms.


Finally
- I realized there are many steps to this, but it is well worth it!
- Add the lemon mixture to the pie then add the merengue on top
- Bake for 20 minutues until the merengue is a beautiful light golden brown color.
- Cool for 30 minutes and refrigerate for at least 1 hour.

After all that LOVE you just put into making this, you and the lucky people you decide to share with will taste it in every bite!

Today is Aloha Friday, and our awesome little town gathers together for a fun festival where locals sell beautiful art, play live music, and eat. I can't wait to share my pie tonight!


.


Wednesday, September 28, 2011

The Begining of a New Life

Due to some recent life changes my blog will be adapting to include new ideas.  Instead of sharing only cooking recipes, I will be sharing multiple ways to accomplish health, wellness, and happiness through diet, physical activity, and environment. 

After doing everything in my control to be healthy by eating gluten-free whole foods and getting plenty of daily physical activity, I was still having health complication after health complication. All my spare time and energy was spent working on my health and receiving constant medical treatment and it became physically, mentally, and emotionally draining. Instead of giving up, my husband and I made the ultimate life changing decision we have ever experienced and started on a journey to find a home in an environment that would allow for optimal health and healing so we could both live life to the fullest. 

I paid off all my debt and left a great job, he attained his second masters degree and cut short his PhD degree, we sold all our life belongings and said our goodbyes to family and friends, and then we set off to the island of our dreams with one suitcase and one backpack each. It was LIBERATING!

Our first week in paradise included the purchase of our island car (named Thrilliam Marcellus Wallace, aka Thrill.i.am), camping at a beautiful north shore beach, and making friends with awesome local islanders. Every day we enjoyed the beauty of the island and people. We woke every morning at 6am and were invited to join our friendly neighbor campers for coffee and fresh island picked fruit where a wealth of knowledge and information was shared, exchanged, and appreciated by us new arrivals. My husband and I followed our morning social hour with a great workout on the beach side park and then swam in the ocean and explored more of the island for the rest of our stay.

By week 2 we were able to secure an apartment in a beautiful yellow beach cottage on the west side of the island where we made even more friends with our new welcoming neighbors. One day we went out to run errands and apply for a local drivers license (when Angel drove I had made a habit of hanging my foot out the car window to enjoy the warmth of the sunshine) so I proceeded to raise my foot on the window ledge when my sandel flew out the car window while Angel was driving 55 mph. After walking around the DMV and street sidewalks barefoot all day I finally took my drivers test and failed by one point, not my brightest moment (or should I say day) in life. Fortunately, Angel passed his drivers test and on the way home I spotted my sandal on the roadside and put it back on my newly blackened, burnt, and humiliated foot. LOL. 

We are now in the third week of our new life and things keep falling into place. I feel more relaxed with each breath I take here. I happily passed my drivers test on my second try (only missed 2) What What! Yes, I did study this time.  Angel is applying for some promising job openings at the local community college and we are just keeping our fingers crossed. I feel like I am gaining more strength and energy with each day and know I will feel better and better as time goes by. For now, I am using this precious time to meet the locals and learn about our resources so I can start a successful business that contributes back to the community. I can't wait to get my gluten-free cafe running so I can feed anyone who wants to eat and enjoy the most nutritious and delicious local fare! 


Stay tuned for more ways to increase your quality of life! I will be sharing more healthy recipes, workout plans, and local ways to live your life to the fullest.

Aloha!

Tuesday, June 28, 2011

Summer Living Smoothie Style!

If you have read all my blogs for the month of June then by now you should know a few things about me:
  1. I love summer
  2. I love to cook AND eat (especially Mexican food)
  3. I love to be physically active (aka play) outside
  4. and last but not least,

did I mention that I LOVE Summer!

One of the many reasons I enjoy summer is because of the abundance and variety of fresh, ripe, sweet, and juicy fruits that are just waiting for me to eat them. You should enjoy them as much as possible too because they pack a good nutritional punch in every bite with all the vitamins, minerals, and disease fighting antioxidants they contain. Don't forget to eat from every color group because each color provides different health benefits.

These are my absolute favorite smoothie concoctions that I enjoy eating almost every day during the warm months for lunch or as a pre workout energy meal. They are always affordable to make when produce is in season and I can take them with me to work or any place I need to go and they also take very little time and energy to prepare. So blend up one of my favorite mixtures or come up with your own by including your favorite fruits of the season.

Tropical Tahitian Blend

  • Half of 1 fresh pineapple

  • 10-12 ounce bag of frozen mango

  • 6 ounces of frozen or fresh blackberries (berries are optional but add a nice great touch)

  • 3-4 cups of unsweetened Almond milk

Tropical Thailand Blend

  • 10-12 ounce bag of frozen mango

  • 4 fresh peaches

  • 3 -4 cups of unsweetened Almond milk

Berry Bonanza Blend

  • 1 cup fresh or frozen strawberries

  • 1 cup fresh or frozen blackberries

  • 1 cup fresh or frozen raspberries

  • 3-4 cups unsweetened Almond milk

Add fruit to blender and blend until smoothie style.
These amounts make enough for 2 to 4 people at a time so you can adjust accordingly for individual servings.
The key to a great smoothie is choosing one frozen fruit to create a better blend.
Pick your frozen fruit of choice for any of these blends.
Many times it is more affordable to buy frozen fruits, especially berries, mangoes, and other tropical fruits that are not grown here.

Health Facts:
- Almond milk is naturally free of gluten, soy, dairy, sugar, cholesterol, peanuts, casein, eggs, saturated fat, and MSG.
- It is an excellent source of calcium, vitamin D & E, and a good source of vitamin A.
- It is naturally vegan and low on the Glycemic Index which is good for diabetes control and weight management.
- It contains only 40 calories and 3.5 grams of (healthy fat) per cup.
- My favorite brand: Blue Diamond Almond Breeze

So drink up and use Almond milk for all your baking, cooking, and/or drinking needs!

Tuesday, June 21, 2011

Summer Living Salad Style!


It is now officially summer and my favorite time of the year because: I get to run, swim, bike and be active outside all day, it is hot and sunny during the day and warm at night, and finally there are so many options for delicious and nutritious meals.

This is the best and easiest time of the year to boost your health: all you have to do is soak up the sun to get your daily dose of Vitamin D, play (be active) outside to get your physical activity, and eat all the fruits and veggies in season to get plenty of vitamins, minerals, and cancer fighting anti-oxidants.

This recipe makes it very easy to add more veggies to your daily diet, you can eat as a side dish or as a meal with a scoop of quinoa, that is my favorite way!

GF Organic Summer Salad
  • 1 head green leaf lettuce
  • 1 head red leaf lettuce
  • 1 bunch flat leaf parsley
  • 1 medium purple onion
  • 2 carrots
  • 1 cucumber
  • 1 green bell pepper
  • 1 cup sliced mushrooms
Serves 4-6 people, I make a big salad that lasts about 2 days for me and my hubby.
Chop all veggies and mix together in a large bowl.

Fresh veggies are all naturally gluten-free but beware of processed bottled dressings that not only may contain gluten but also preservatives, additives, and unnecessary sugar. This dressing recipe is so easy to make, it only takes a few minutes to prepare, and it tastes way better than that bottled crap. =)

GF Lemon Vinaigrette Dressing
  • 1/2 cup extra-virgin olive oil
  • Juice of 2 lemons
  • Kosher or sea salt
  • Freshly ground black pepper
  • Italian seasoning: or combine dried herbs: oregano, thyme, marjoram, and rosemary.
In a small bowl, mix together olive oil, lemon juice, and desired amounts of salt, pepper and dried herbs.
Serve 1 or 2 spoonfuls over a serving of salad.

Health Tip /Facts:
Eat your salad with this lemon vinaigrette at the end of your meal to ease digestion, absorb more minerals and nutrients, promote weight loss, cleanse your blood, and cool the body from summer heat.

These leafy greens and veggies are full of nutrients that help eliminate waste from the body, reduce body fat, keep your skin looking and feeling healthy, cleanse your blood, reduce inflammation and infections, and prevent and treat illness, disease, and cancer.

So eat them all up!

Friday, June 10, 2011

Mexican Brown Rice


I am so happy brown rice is gluten-free because it provides so many health benefits and it is easy and fun to cook in so many different ways that never fail to turn out amazing. To get more insight of the many healing qualities of brown rice, visit the link below to view my facebook note:

https://www.facebook.com/#!/note.php?note_id=355085354823

I like to eat whole grain brown rice at least 2 to 3 times a week and this recipe will give you another great way to include it in your diet as well: you can serve it for any meal as a side dish or make it the main course by adding beans, meat, or veggies. To make the perfect meal that is vegetarian as well, try this rice with my homemade refried beans recipe (recipe featured last month) and top with avocado and salsa verde (recipe in January 2011 archive). This also goes very well with my Carne Asada, enchiladas (recipe coming soon), and much much more! I sure hope you get to try it soon!

Organic and GF Ingredients
  • 3 cups rinsed whole grain brown rice
  • 1 medium white or yellow onion
  • 2 medium tomatoes
  • 3 garlic cloves
  • granulated garlic powder
  • kosher or sea salt
  • extra virgin olive oil
  • water
Preparation:
In a pot filled with water, boil the tomatoes until the skin starts to peel off, then drain the water and cover the pot to let the tomatoes steam. After steaming for about 5 minutes, peel the skin off the tomatoes and puree in a blender until smooth with salt, garlic cloves, and garlic powder.

In the rice pot, add olive oil, enough to fill the bottom of the pot, and heat up on medium heat. Then add the rinsed brown rice and chopped onion and turn up to medium high heat, stir frequently, for about 10 minutes, until rice is evenly browned.

Add water and the tomato puree to the rice pot: make enough liquid to double the rice, this recipe needs 6 cups total of water and tomato puree together. Keep on medium high heat and bring to a boil.

After rice boils for a couple of minutes, turn the heat down to low and simmer for 65 to 75 minutes or until rice is fluffy and water is evaporated. Let stand for 10 minutes before serving.

Let's Cook!


Sunday, June 5, 2011

Summer Living Carne Asada Style!

I need to apologize for the long break I have taken from my food blog, sometimes life gets in the way of things you want to do and that is exactly what happened. I planned on sharing my favorite Mexican recipes for the month of May because of Cinco de Mayo but I was unable to post them all due to my blogger break. Now it is already June (and thank God for that!) because I was in dire need of warm weather and summer to arrive here in the Mid-West after our stubborn lingering winter made our spring season painfully cold.

I must say, I feel like a completely different person in the warmer months: I love living!
There is nothing like good friends, good music, good outdoor fun, and good food of course! I only left out family because that is the one thing I am missing in my life right now. I cannot wait for the times I will get to share with them.

So this meal is dedicated to family, friends, summer, and living it up! I love to cook, but I LOVE to cook even more for family and friends. I am truly blessed to have a husband who enjoys and appreciates every meal I make, but I still do not feel completely satisfied unless we have others to share with the experience of a truly delicious and nutritious meal.

Carne Asada


  • Grass Fed skirt steak

  • GF Soy Sauce: San J Organic Tamari GF Soy Sauce

  • Juice of 1 lime

  • Granulated garlic powder

  • Kosher or Sea salt

  • Freshly ground black pepper

-Prepare the charcoal grill first (that is where my husband comes in handy =)
-Place steaks flat in a large and deep baking dish.
-Add garlic powder and salt and pepper to both sides of steaks.
-Add fresh lime juice and enough soy sauce to cover the steaks.
-Marinate in the refrigerator for at least 30 minutes.
- Grill steaks on each side, I prefer cooked to medium well.

The Fix-ins:


  • Enjoy Life GF Whole Corn Tortillas: Found at Whole Foods. Just warm up on the grill after the meat is ready.

  • Rebecca's Salsa Verde (see recipe in January 2011 archive)

  • Rebecca's Guacamole (recipe coming up soon!)

  • Freshly squeezed lime juice

  • Chopped cilantro and onion
Don't forget your favorite cocktail!
I prefer a Pina Colada or Mai Tai: Recipes coming soon!

I get affordable grass fed beef from City Fresh Market located at the French Market in Chicago. Look up your local farmers markets for farmers who sell affordable grass fed beef, and by that I mean they are cheaper than Whole Foods Market. You should expect to pay more for good quality food. You will actually save money by staying healthy and avoiding expensive medical bills.

Health Facts:
Grass-fed cows are humanely raised on free range farms and are never fed corn and/or grains because that causes them to get sick and in turn need antibiotics. You are more likely to get food poisening from conventional meat than from grass-fed meat.
Meat from grass-fed cows contains no hormones or antibiotics and contains less saturated and total fats than conventional beef, it contains 2-4 times the amount of Omega-3's and 3-5 times the amount of CLAs, all believed to improve cardiovascular health and fight cancer and disease. Beef is also a good source of protein, iron, and Vitamin B12.

Tuesday, May 10, 2011

GF Strawberry Liquado


The next addition to my month of Mexican recipes goes to the Mexican version of what we know as the smoothie. This delicious treat is perfect for warm days and will satisfy your thirst and hunger at the same time. Enjoy it as a snack, meal, or even dessert!

I have come up with many varieties of delicious smoothies (which I have yet to share) but when my husband whipped up this version for me I was hooked on the first slurp. This is something his mother, Aurora Camacho, used to make for him when he was a child. I am so grateful for all our wonderful mothers who have taught us so much. Just one of the many important things I learned from my mother-in-law and husband is:
the most important ingredient in any recipe is Love- and love can be found in just about any Latin recipe. I hope everyone, especially all the great moms, had a wonderful mothers day this year!

Ingredients
  • 1 bag of frozen strawberries (2 cups)
  • 2 cups of unsweetened almond or coconut milk (add extra water in need)
  • 1 pinch of cinnamon
  • 2 TBS. local raw honey
Add all ingredients to a blender and blend until liquado. Add more almond milk as needed. The key is to have it more liquidy than smoothie.

Sorber!

Thursday, May 5, 2011

Cinco de Mayo Celebracion: GF Mango Margaritas


Cinco de Mayo ("fifth of May") is a Mexican holiday that commemorates the Mexican army's unlikely victory over French forces at the Battle of Puebla on May 5, 1862. The holiday has little significance in Mexico and is observed primarily in the U.S. and the state of Puebla to celebrate Mexican heritage and pride. Mexicans and Latinos living in California during the American Civil War are credited with being the first to celebrate Cinco de Mayo in the United States. Cinco de Mayo is not Mexico's Independence day, the most important national patriotic holiday in Mexico.

Ever since I was a child growing up in California, Cinco de Mayo has always been a holiday that was celebrated and recognized. It is a great way to partake and enjoy the wonderful food, dance, and culture of the Mexican people. Now that I am an adult, I also love to enjoy a delicious homemade Margarita!

If you are unable to enjoy one today, make sure you get a chance soon. I will be making one for my husband and I while listening to Ana Gabriel and watching Teresa on Univision, as soon as I finish this blog.

Today I am sharing my favorite margarita recipes, don't be afraid to make up your own version. The key is using pure ingredients and a quality tequila. Tequila brands I recommend are: Hornitos and 1800 for the budget conscious, and Patron and Don Julio when you are able to bust out the big bucks.

Makes 4 servings

Mango Margarita
  • 4 shots puro de agave (100% from agave) tequila reposado
  • 1 bag (14 ounces) of frozen mangos
  • juice of 2 limes
  • 2 cups water
  • 1/2 cup sucanet
Add all ingredients in a blender and blend until smooth. Before pouring, salt the rim of all margarita or cocktail glass's.

Strawberry Margarita
  • 4 shots of puro de agave (100% from agave) tequila blanco
  • 1 to 2 bags of frozen strawberries
  • juice of 2 limes
  • 2 cups water
  • 1/2 cup sucanet
Add all ingredients in a blender and blend until smooth. Before pouring, salt the rim of all margarita or cocktail glass's.

Viva Mexico!

Sunday, May 1, 2011

Mexican May(hem): GF Plantain Empanadas


It is now the month of May and I cannot tell you how excited I am for the recipes I am about to share. This month I will be focusing on all things Mexican! I have been waiting to share my favorite Mexican dishes for a while now and if you have tried mi Salsa Verde or Chilaquiles recipe than you know this white girl ain't no joke. =) I absolutely loved growing up in Los Angeles, not just for the great weather and ocean, but also because it exposed me to authentic Mexican culture and cuisine. Mexican food is not only my favorite food but I believe it to be the most delicious food in the world! Yeah I said it.

My first Mexican recipe for the month of May comes from a restaurant in Mexico City and was shared by Pati's Mexican Table; a cooking show on PBS featuring authentic Mexican recipes. They called it Plantain Quesadilla's, but because of the way it is cooked, how it looks, and a few minor changes I made to the recipe, I am calling them Empanadas. Whatever you call it is not the point, what matters is the end product and how much you are going to love it! It was labor intensive and time consuming, but what authentic Mexican food isn't? And more importantly, what authentic Mexican food isn't worth the time and effort?

Plantain Empanada stuffed with Refried beans

Makes from 6 to 8 large Empanadas

Ingredients

  • 4 large or 6 medium yellow plantains
  • 1 bag dried pinto beans
  • 2 jalapenos
  • 2 anaheim chilies
  • 2 hot banana peppers
  • 1/2 white or yellow onion
  • 1/2 bunch cilantro
  • safflower or olive oil
  • kosher or sea salt
  • freshly ground black pepper
  • garlic powder

Rebecca's Refried Beans

There are many ways to make refried beans but I like to add a little kick to mine. To prepare: soak dried pinto beans over night in a large pot of water. Drain and refill water at least once, I like to drain twice through soaking process to remove excess acid from the beans so they are easier to digest. In the large pot filled with water, bring the beans to boil then turn heat down to low and cover and simmer for 2 hours. Do not add any salt to the beans until the end of the cooking process (your beans will turn out very hard if you add salt too early). When beans are tender, drain the water leaving a little left in the beans to keep the beans moist. Mash the beans until smooth. Dice all peppers/chilies and chop onion and cilantro. In a large pan saute chilies, onion, and cilantro in olive or safflower oil on medium heat for about 10 minutes. Add mashed beans, kosher or sea salt, freshly ground pepper, and garlic powder and mix together. Turn refried beans on low and cook for 10 more minutes.

Plantain Masa

The key to making the masa is selecting the right plantain. There are 3 stages you can cook a plantain: green, yellow, and black. Make sure you use only yellow plantains (they may have some black spots.) Place the whole plantains, with skin on, in a large pot filled with boiling water. Simmer, partially covered, for 30 minutes, until they are thoroughly cooked. Remove from the water and let cool. Peel the plantains, slice, and mash together with your hands until very smooth.

Make round balls of about 3 inches. Press in between plastic rounds in a tortilla press or roll with a roller until you get a flat disk. Place a tablespoon of refried beans right in the center and fold like a turnover and press edges together with fingers.

In a large deep skillet, add enough oil to have an inch high. One medium heat, about 5 minutes later, when it is hot but not smoking, insert the empanadas a few at a time. Let them fry, about 4-5 minutes on each side until nice and browned. Remove and place on a paper towel to drain excess oil.

Optional: Serve with Mexican crema and mi salsa verde (recipe found in blog archive January 2011)

!QUE SABROSO!


Saturday, April 16, 2011

O GF Brunch: "Bread-with-a-hole-with-an-Egg-in-the-Middle"


It is a chilly, windy, and rainy spring Saturday and my stomach was growling so my awesome Boobie Love (in case you don't know my husband and I call each other this <3) made me the most delectable dish ever! I love that he comes up with the most creative and wholesome meals at times when I need a break from the kitchen, and yes, even I need a break sometimes. I must give my mother-in-law credit for this because she really taught him all he knows. Aurora Camacho, the Cooking Queen, created a Breakfast King (Angel Camacho); a title no one could strip either of. They both have earned these titles by simply making meals out of whole healthy foods and plenty of love (the secret ingredient to any meal or treat).

Sorry for all the cheese, but cheese is good sometimes =)

So this delicious and nutritious breakfast, brunch, or even great for lunch and dinner was something my mother-in-law, Aurora, used to make for her Sun (Angel) when he was a little boy. It uses a few simple and pure foods that turns into a satisfying, healthy, and comforting meal.

Angel has always wanted to make this for me and I am so lucky he was finally able to after I found a healthy gluten-free sandwich bread that is also dairy, soy, and nut free too.
The brand is Udi's and it is the Whole Grain Bread made from whole grain brown rice flour. You can find it at Whole Foods market, Pea Pod in Chicago, or online at:
www.udisglutenfree.com

The rest of the Ingredients are just as simple:
- Eggs (from cage free, hormone and anti-biotic free, vegetarian fed chickens, aka: organic)
- Unrefined extra-virgin olive oil
- Kosher or sea salt
- Freshly ground black pepper

From my Boobie Love, here is how you make it:
- Use a pan that is wide enough to fit at least 2 slices of bread in at the same time.
- Fill pan with olive oil, just enough to thinly cover the bottom, and heat slowly on medium heat.
- Use a round cookie cutter (or a small rimmed glass) to cut out a hole in the middle of the bread; hence the name of the dish ;-)
- In the pan cook the bread slightly, for about 1 - 2 minutes on each side.
- Don't forget to cook the cut out bread circles too.
- After bread is slightly cooked add one egg in each hole of each slice of bread.
- Cook egg in the bread slowly on no more than medium heat and sprinkle with salt and pepper.
- When the white of the egg is cooked, flip over and finish cooking on the other side.
- Add more salt and pepper on the other side and bread circles.
- The middle yolk should be cooked over easy when finished.
- Plate and serve

Use the toasted bread circles to slurp up the yummy egg yolk as you eat through this dish.

I wish this meal never ended! Mmmmmmmmm

Thursday, April 7, 2011

O GF Mushroom Rissoto


This savory and satisfying meal is perfect for spring when the weather is still trying to warm up and you need a filling yet light meal that is great for maintaining a healthy body. Brown rice is a powerful healing food that is great for the prevention and treatment of many healths conditions including diabetes, high blood pressure, and high cholesterol. All the taste and nutrients in brown rice are lost when processed into white rice. White rice or refined rice (like minute rice) only contributes to chronic diseases like diabetes and obesity.
Don't miss out on the many health benefits of brown rice, here are just a few:

Slows the aging process
Boosts respiratory function (for asthma)
Detoxifies the body
Protects from cancer and most diseases
Enhances brain function and improves memory
Converts fat to lean body mass (muscle)

Whole grain brown rice takes about an hour to cook so plan ahead. If you do not have enough time to prepare the same night then make it the night before.

Ingredients
organic, gluten-free, vegan, allergy free

- 3 cups cooked brown rice
- 1 container (8 oz.) white mushrooms
- 1/2 oz. dried or 2 oz. fresh porcini mushrooms
- 1/2 oz dried or 2 oz. fresh shitaki mushrooms
I like to use Melissa's dried porcini and shitaki mushrooms
- 3 to 4 carrots
- 1 purple onion
- 6 garlic cloves
- fresh parsley
- 1/4 cup whole flax seeds
- unrefined extra-virgin olive oil
- white wine or sherry wine vinegar
- kosher or sea salt and freshly ground pepper
- dried oregano, marjoram, thyme, and garlic powder

Chop and slice mushrooms, carrots, onion, cloves, and parsley.
In a large pan heat olive oil on medium high heat and add all chopped veggies and flax seed. Saute for about 10 minutes, stirring frequently.
Add dried herbs, garlic powder, salt and pepper, and drizzle over wine or sherry vinegar.
Stir and let wine or vinegar evaporate (a couple of minutes).
Add cooked brown rice and stir until well incorporated and hot.
Serve and garnish with fresh parsley

Savor every bite!


Monday, March 28, 2011

Spicy Friday Fish Tacos!

One of my all time favorite foods goes to the famous fish taco. Instead of waiting for a trip to California, Mexico, or Hawaii (where the best fish taco's are made and eaten) I decided to master it right now in my own kitchen. It is so easy anyone can do it and look and feel like a gourmet chef. I love great fish recipes because they are so rich in healthy omega-3 fats and lean protein. This recipe also provides plenty of vegetables and whole grain corn. It is just a light and delightful meal that is perfect for any health conscious eater and food lover!


Ingredients

Organic & Gluten-free (O GF)

- 1/4 head of cabbage
- 1/2 bunch of cilantro
- 1 avocado
- Rebecca's salsa verde (see recipe in January 2011 blog archive)
- Mexican crema, sour cream, or favorite shredded cheese (optional)

Prepare taco toppings:
- chop cabbage and cilantro, dice avocado, and prepare homemade salsa.

Gluten-Free Corn Tortillas:
- Make your own by using Maseca (masa harina flour), lime juice, salt, and water.
- Knead and roll dough into balls, then flatten with a tortilla presser.
- Cook on a comal (flat pan) for about 2 minutes on each side.
- If you cannot make your own find a healthy whole grain and gluten-free brand.
- My favorite brand that uses organic sprouted whole grain corn: Food Life
- Food Life tortillas can be found at Whole Foods.
- If you have a corn allergy / intolerance, Whole Foods also has a delicious brown rice tortillas.

Prepare spicy fish:
- 4 fillets of either mahi mahi, halibut, or talapia fish
- 1 cup brown rice flour
- 1 tablespoon chili powder
- 1 tablespoon cayenne pepper
- 2 tablespoons oregano
- 1 tablespoon kosher or sea salt
- juice of 1 freshly squeezed lime
- 1/2 cup unrefined extra-virgin olive oil

In a large pan heat olive oil on medium-high heat.
In a bowl mix together flour, chili powder, cayenne pepper, oregano, and salt.
In a separate bowl squeeze juice of one lime.
Dip fish fillets in lime juice and then cover with spicy flour batter.
Cook fish in pan with heated olive oil until browned and crispy, about 5-7 minutes on each side.

Finalmente: Create your Spicy Fish Taco!
- On each tortilla add: fish, cabbage, cilantro, salsa verde, avocado, crema (optional), and a squeeze of lime.

Es muy delicioso!

Sunday, March 27, 2011

O GF Cocoa Banana Bread topped with Banana ice cream


After a long, dark, and freezing cold first week of spring, a warming comfort food was definitely necessary to pull through this winter season that just does not want to let up here in the Midwest. I had some very ripe organic bananas just asking to be used so I decided to make my delicious banana bread recipe with a chocolaty twist. The smell it creates while baking will make your mouth water even before the first bite!

Tip: if you ever have ripe bananas and you don't have time to bake them, don't let them go to waste, just freeze them. I will tell you how to make the most healthy and delicious ice cream from them!

Pre-heat oven to 375 degrees

Ingredients

Organic & Gluten-Free (O GF)

- 3 / 4 very ripe bananas
- 2 cups brown rice flour
- 1 cup ground flax seed
- 1/2 cup unsweetened & alkaline free cocoa powder ( I use Chatfield's)
- 1 cup unsweetened almond milk
- 1 cup coconut sugar
- 1/2 cup unsalted butter
- 2 eggs
- 1 teaspoon pure vanilla (without corn-syrup, read the label)
- 1 teaspoon kosher or sea salt
- 1 teaspoon baking soda

In a mixing bowl mash ripe bananas, add beaten eggs, agave nectar, almond milk, melted butter, and vanilla and mix together.
In a separate mixing bowl add all dry ingredients and mix together, then add to liquid ingredients and mix until well incorporated.
Pour in a buttered 9 x 9 baking pan and bake for 60 minutes.

Banana Ice Cream Topping
- Use 2 or 3 frozen and peeled bananas
- In a food processor or blender add frozen bananas and a 1/2 cup coconut or almond milk.
- Blend for about 5 minutes or until very smooth.
- Top over any dessert or eat as is
- It is that easy and delicious!

Monday, March 21, 2011

Grilled, Gluten-Free, Grass-Fed Burgers and Organic Veggie Kabobs

There's nothing better than being able to enjoy the warmer months with healthy outdoor meals. If you don't have an outdoor grill you can 1- just get one already it's worth it, or 2- use a grill pan on your stove-top, it's not quite the same but it'll have to do.
I prepare a gluten-free burger by simply replacing the bun with leafy green lettuce. I have noticed gluten-free hamburger buns available at the grocery store but they are made with refined flours and contain processed sugar, additives, and preservatives that are just not good for anyone. Foods in their most natural state are always healthier for you and the only process it should go through is the one you use to cook and prepare it. So enjoy this meal soon because it not only provides a party in your mouth but it also provides heart-healthy fiber, fat, protein, and an array of vitamins and minerals from all the organic vegetables you will eat!

Grilled GF/GF Burgers
For a vegetarian option use portabella mushrooms in place of meat
serves 4
- 2 lbs grass-fed beef
I get my meat from Whole Foods or the French Market
- 2 Tbs unrefined extra-virgin olive oil
- Kosher or sea salt, freshly ground black pepper, and garlic powder.
- Mix the olive oil, salt, pepper, and garlic powder into the meat and form patties with parchment paper. Cook on outdoor grill or grill pan.
I have my husband to thank for this one =)

Burger Toppings
- organic leafy green lettuce
- organic onion slices
- heirloom tomato slices
- organic avocado slices
- organic / grass fed pepper jack cheese
- organic ketchup
My favorite brand: Organicville, because it's made with agave nectar instead of sugar and tastes amazing!

Organic Veggie Kabobs
- 1 yellow onion
- 1 purple onion
- 1 red bell pepper
- 1 green bell pepper
- 2 zucchini's
- 1 container mushrooms
- kosher or sea salt, freshly ground black pepper, unrefined extra-virgin olive oil.

Cut all veggies (except mushrooms) in 2 -3 inch pieces. Before placing the veggies on, soak the wooden skewers in water for 10 minutes so they do not burn on the fire. After putting on all the veggies, drizzle with olive oil, salt, and pepper.

Mmmmm, Mouth Watering!